
In cPanel, FTP (File Transfer Protocol) accounts refer to accounts that are specifically created to allow users to access files on your web server using FTP. FTP is a standard network protocol used for transferring files between a client and a server on a computer network.
An FTP account in web hosting is a specific user account created on a web server that allows individuals or organizations to transfer files to and from their website’s server. FTP accounts are commonly used for uploading, downloading, and managing files related to website content, such as HTML files, images, scripts, and other media.
Creating FTP accounts through cPanel allows you to grant access to specific directories on your web server to other users or services. Each FTP account has its own username and password, and you can control the level of access and permissions granted to each account.
Table of Contents
Exploring the Diverse Applications of FTP Account
FTP accounts in cPanel are useful for various purposes, including:
- Website Maintenance: You can create FTP accounts for developers or team members who need to upload or download files to your website for maintenance or updates.
- File Sharing: You can create FTP accounts to share files with clients, colleagues, or friends securely over the internet.
- Content Management: If you have multiple websites or sections within your website, you can create separate FTP accounts for each to manage the files more effectively.
- Access Control: You can restrict access to certain directories by creating FTP accounts with limited permissions. This helps enhance security by controlling who can access specific files or folders on your server.
Steps to create FTP account
To create an FTP account in cPanel, you typically need access to your cPanel dashboard. Follow these steps:
Login to cPanel: Go to your web browser and type your domain followed by /cpanel (e.g., yourdomain.com/cpanel). Enter your username and password to log in.
Locate FTP Accounts: Once logged in, search for the “FTP Accounts” icon. It’s usually located in the Files section or you can use the search bar at the top left corner to find it quickly.

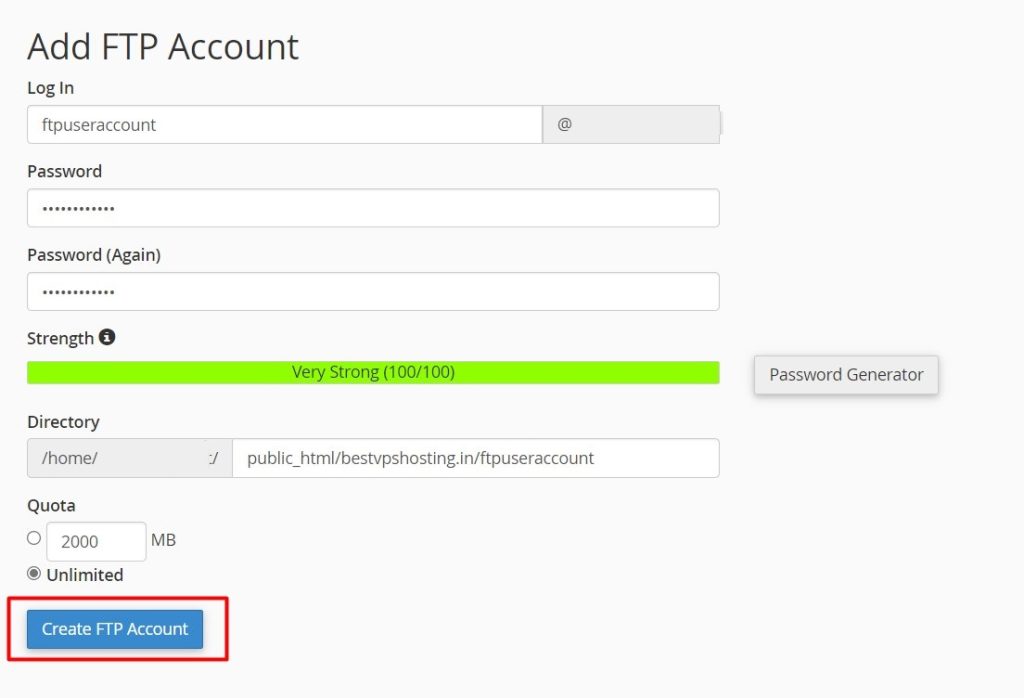
Create a New FTP Account: Click on the “FTP Accounts” icon. You’ll see a form to create a new FTP account. Fill in the details:
- Login: Enter the username for the FTP account.
- Password: Enter a strong password for the FTP account or use the Password Generator to create one.
- Directory: Specify the directory the FTP user will have access to. By default, it will be something like
/home/yourusername/public_html, but you can change this if needed. - Quota: Optionally, you can set a quota for the amount of disk space the FTP account can use.
Configure Additional Options (Optional)
You may also see additional options like FTP Session Control, where you can limit the number of simultaneous connections an FTP account can have.
- Create the Account: Once you’ve filled in the required details, click on the “Create FTP Account” button.
- Confirmation: After successfully creating the FTP account, you’ll see a confirmation message.
- Test the FTP Account: Use an FTP client (such as FileZilla) to test the newly created FTP account. Enter the hostname (usually your domain name or server IP address), FTP username, password, and port (usually 21) into your FTP client to establish a connection.
FileZilla is a popular, open-source FTP (File Transfer Protocol) client software that facilitates file transfers between a local computer and a remote server. It’s widely used for managing website files, uploading and downloading content to and from web servers, and performing various file management tasks.
That’s it! You’ve successfully created an FTP account in cPanel.